How to run your own Helm Repository on Azure Container Apps
Do you use Helm charts for packaging and deploying your stuff to Kubernetes? Have you ever thought about creating your own Helm repository to store and distribute your charts? This article explains how to take ChartMuseum and run it on Azure Container Apps backed by an Azure Storage Account. You can find all source code shown in this example in the 005-chartmuseum folder of my Azure Container Apps samples repository on GitHub.
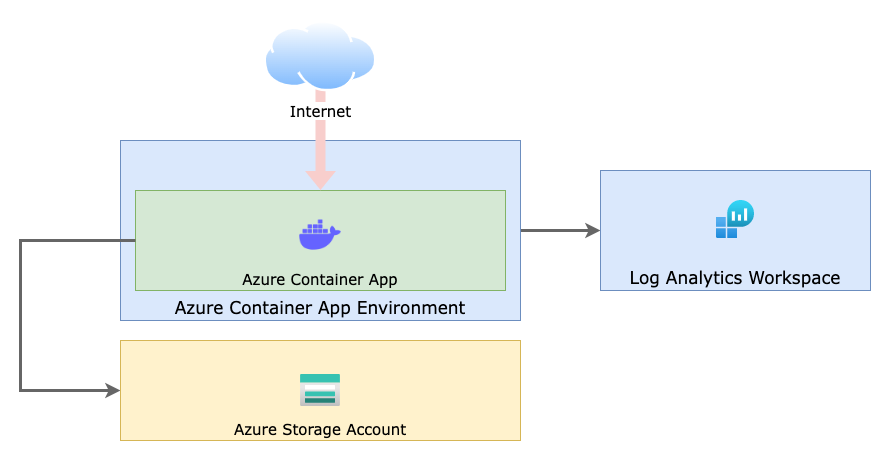
Overall Architecture🔗
We must allow inbound connections from the internet to make the repository accessible for anyone. On top of that, we must run ChartMuseum and provide a Blob Storage container for persistence. The Log Analytics Workspace shown in the diagram is used to collect logs from our ChartMuseum container at runtime.
ChartMuseum configuration options🔗
ChartMuseum provides a vast amount of configuration properties that you can use to configure it according to your needs. For demonstration purposes, we’ll configure the persistence using an Azure Storage Account and ensure endpoints for publishing, updating, or removing charts are protected using basic authentication. (For real-world deployments, you should definitely configure authentication based on OAuth 2.0).
Provide individual ChartMuseum configuration using environment variables and secrets🔗
At the point of writing this article, Azure Container Apps still lacks Azure Key Vault integration support. That said, we must specify configuration using environment variables for non-sensitive and secrets for sensitive configuration data. If we take a closer look at the main.bicep file, we see how both sensitive and non-sensitive values are configured properly for ChartMuseum:
module containerApp 'aca.bicep' = {
    name: 'chartmuseum'
    params: {
        name: 'chartmuseum'
        location: location
        containerAppEnvironmentId: containerAppEnvironment.outputs.id
        containerImage: containerImage
        containerPort: containerPort
        secrets: [
            {
                name: 'basic-auth-password'
                value: adminPassword
            }
            {
                name: 'storage-account-access-key'
                value: storageAccount.outputs.primary_access_key
            }
        ]
        envVars: [
            {
                name: 'PORT'
                value: '${containerPort}'
            }
            {
                name: 'AUTH_ANONYMOUS_GET'
                value: '1'
            }
            {
                name: 'BASIC_AUTH_USER'
                value: adminUser
            }
            {
                name: 'BASIC_AUTH_PASS'
                secretRef: 'basic-auth-password'
            }
            {
                name: 'STORAGE'
                value: 'microsoft'
            }
            {
                name: 'STORAGE_MICROSOFT_CONTAINER'
                value: 'charts'
            }
            {
                name: 'STORAGE_MICROSOFT_PREFIX'
                value: ''
            }
            {
                name: 'AZURE_STORAGE_ACCOUNT'
                value: storageAccountName
            }
            {
                name: 'AZURE_STORAGE_ACCESS_KEY'
                secretRef: 'storage-account-access-key'
            }
        ]
        useExternalIngress: true
    }
}
Infrastructure provisioning🔗
You can issue the deployment quickly using Azure CLI. Create a new Azure Resource Group (az group create) and start the deployment with az deployment group create. Before starting the deployment, Azure CLI will ask for the adminPassword.
# Create a new Azure Resource Group
az group create -n rg-chartmuseum -l northeurope

# Start the Deployment
az deployment group create -g rg-chartmuseum -f ./bicep/main.bicep
# Provide admin password when asked...
Grab the associated fully-qualified domain name (FQDN)🔗
We must know the FQDN associated with the Container App upon provisioning. Again we can use Azure CLI and store the FQDN in a local shell variable:
 repositoryRoot="https://"$(az deployment group show -g rg-chartmuseum --name main \
   --query "properties.outputs.fqdn.value" -otsv)
Publish a custom Helm chart🔗
Let’s quickly create, package, and update a custom hello-world Helm chart to check if we can publish a chart to our repository:
# Create a new Helm chart in `./hello-world`
helm create hello-world

# Package the Helm chart
helm package ./hello-world

# Post the Helm chart to /api/charts
curl --data-binary "@hello-world-0.1.0.tgz" $repositoryRoot/api/charts -u demouser
#> provide your password
Add the repository to your Helm CLI🔗
Having our first chart published to the custom repository, we can check if everything worked as expected by adding the repository to the helm CLI.
# Add custom repository
helm repo add aca $repositoryRoot

# Update the repository feed
helm repo update aca
You can ask helm to list all charts stored in a particular repository using helm search repo. So let’s give it a spin:
# list all charts in the custom repo
helm repo search aca
NAME               CHART VERSION  APP VERSION   DESCRIPTION
aca/hello-world    0.1.0          1.16.0        A Helm chart for Kubernetes
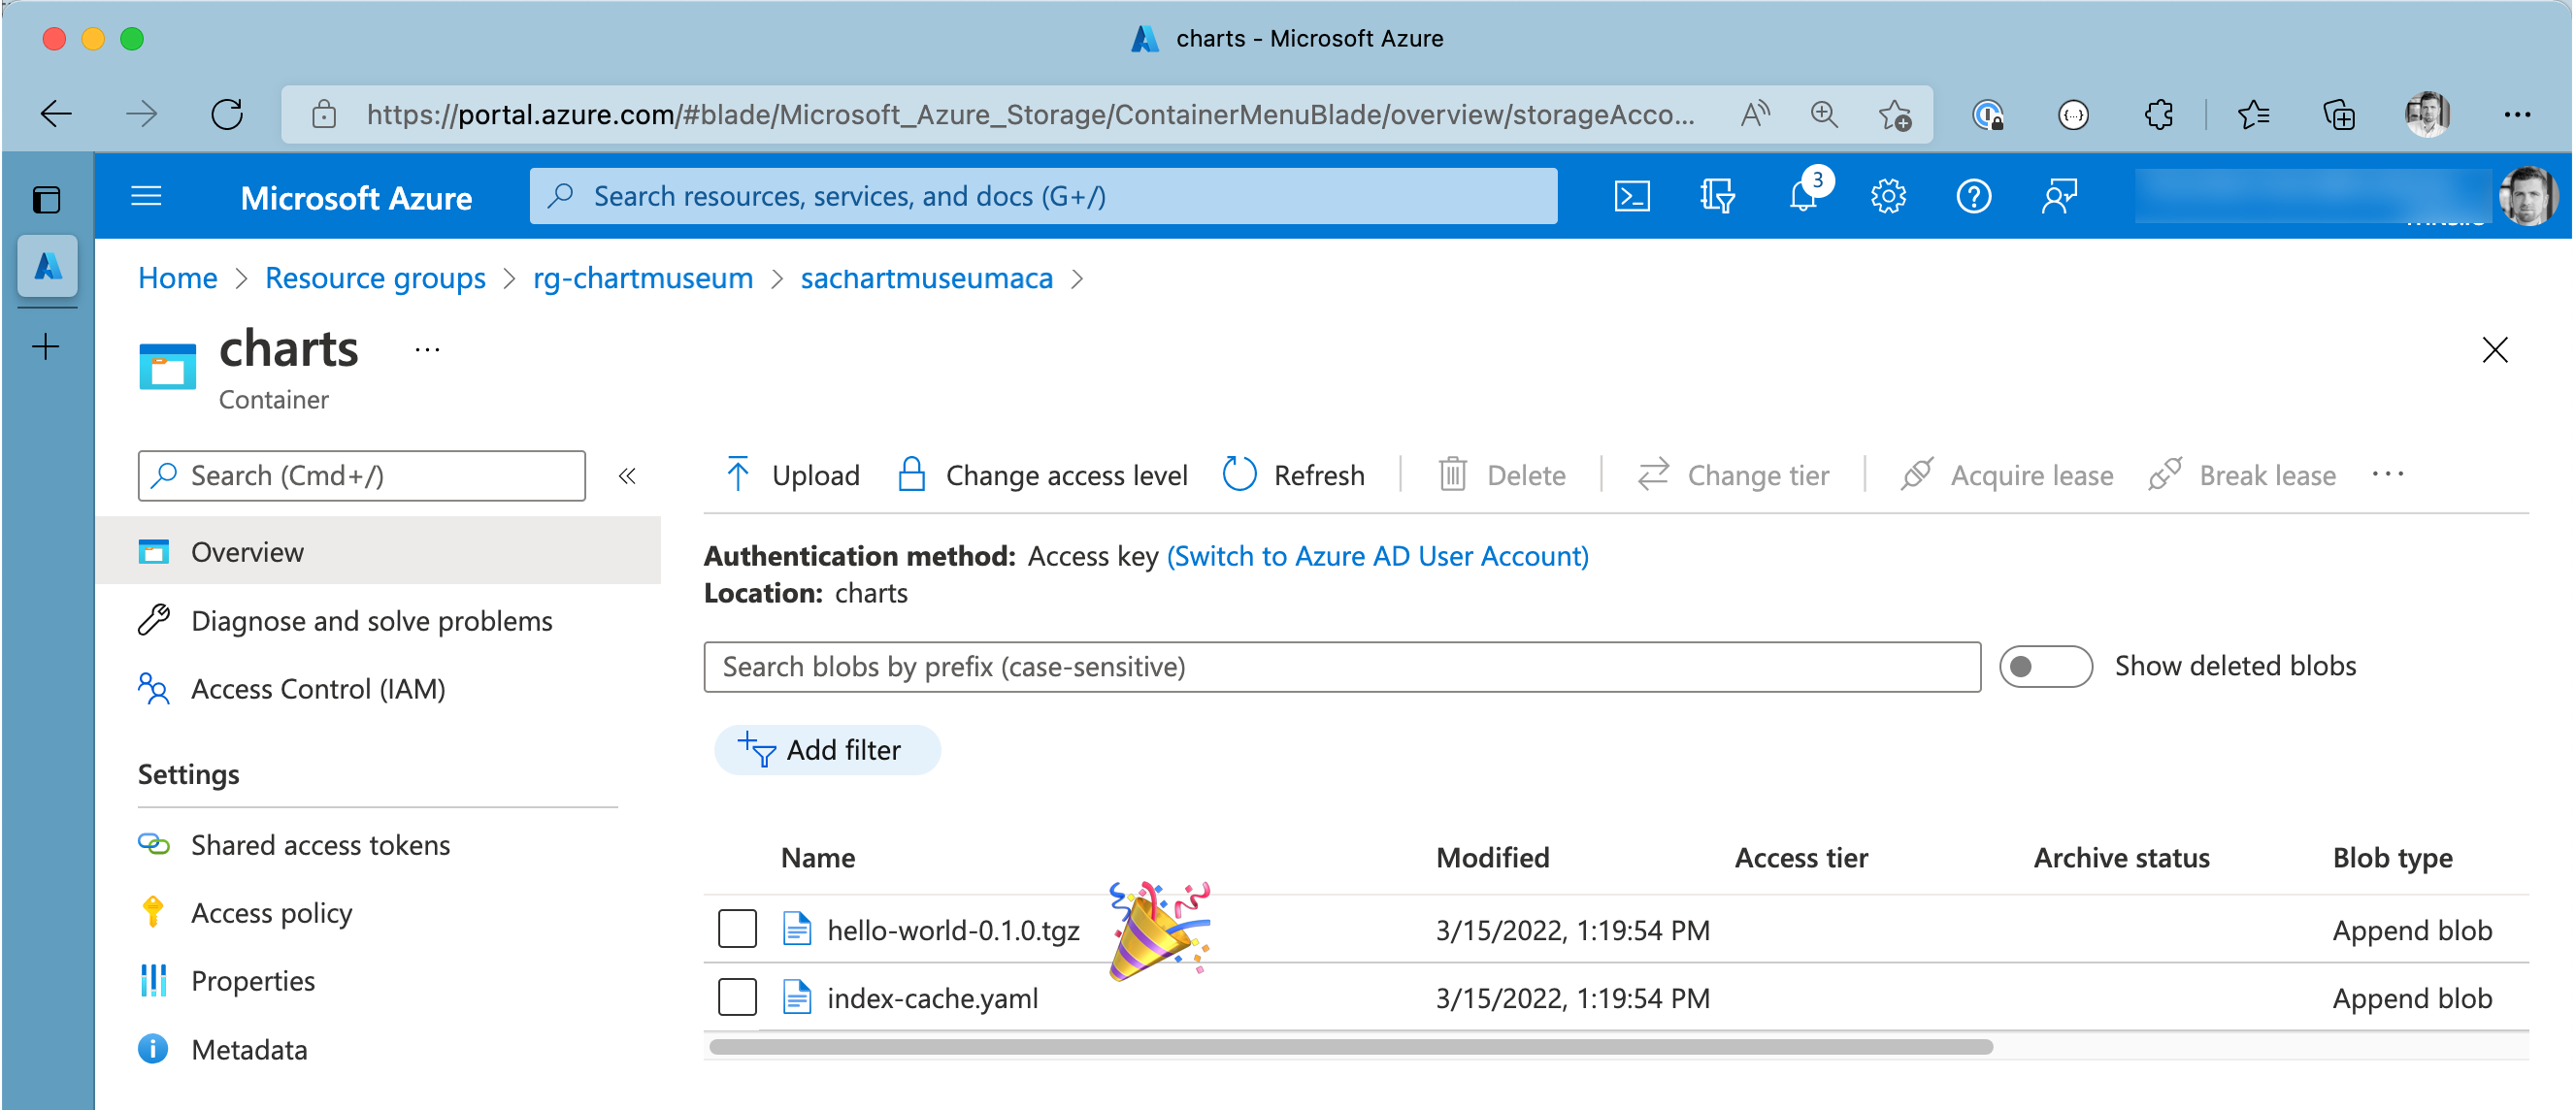
Double-check chart persistence in Azure Storage Account🔗
Finally, we can look at our blob storage container to verify the packaged chart has persisted as expected. Browse your Azure Storage Account using Azure Portal and find the hello-world-0.1.0.tgz.
Happy helming