Let's build a serverless Christmas image tagging solution with Azure Computer Vision
By leveraging serverless capabilities provided by Azure, we can focus on actually building something instead of managing or taming the necessary infrastructure. Azure Computer Vision is one of those serverless capabilities you can use to build cool things rapidly.
Christmas 🎅🏼 is around the corner! That said, it’s time to gear up and flood social media with properly tagged images. To do so, we will build a simple serverless solution that tags all your Christmas images automatically.
This article is a contribution to the Festive Tech Calendar 2021. You should definitely check out all the other fabulous contributions taking place during December 2021!

Festive Tech Calendar 2021
What is Azure Computer Vision🔗
Azure Computer Vision is a suite of cognitive services that helps developers create applications to analyze images and video frames. The service can detect faces, identify objects or scenes in an image, classify the sentiment expressed in a picture, and even measure how much food is on your plate. It’s easy to integrate these features into your applications with REST API calls or by using existing client SDKs. In this article, we’ll use the .NET SDK to interact with Azure Computer Vision.
Prerequirements🔗
To follow along with this tutorial, the following things are required:
- Access to an Azure Account (or start with $200 Azure Credits for free)
- Azure CLI 2.0 (See detailed Azure CLI 2.0 installation instructions)
- Azure Functions Core Tools (See Azure Functions Core Tools installation instructions)
- Some images you want to get tagged (grab some from unsplash.com)
- Visual Studio Code (Download Visual Studio Code from here)
- curl or any other tool to issue HTTP requests
Solution Architecture & overall workflow🔗
We need a couple of Azure services to build our Christmas Image Tagger from an infrastructure perspective. We need an instance of Azure Computer Vision. An Azure Storage Account is used to store uploaded images and hold tags recognized by Azure Computer Vision. Those tags will be stored as custom metadata directly on the uploaded image (blob).
We will create necessary APIs using Azure Functions and deploy an optional Application Insights instance to collect individual logs from various functions we have to create.
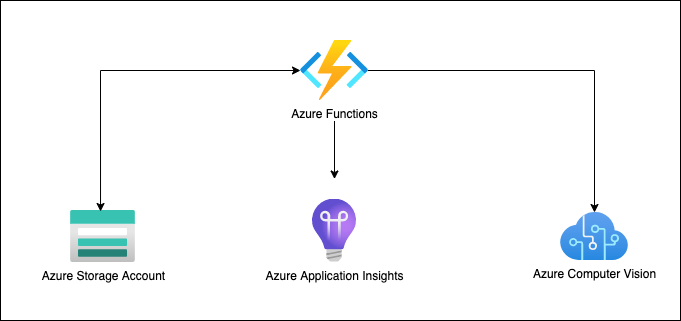
Christmas Image Tagger Architecture
We won’t build a custom frontend as part of this article. Instead, we will use curl as a frontend 💻. In a real-world scenario, you can - for example - create a custom Single Page Application (SPA) and host it using Azure Static Web Apps to go full-serverless! 🚀
The overall workflow is also fairly simple and can be described in six simple steps:
- Users upload images by sending a
POSTrequest to/images. The provided image will be stored in theimagescontainer of the Azure Storage Account (filename will be returned as HttpResponse) - The
OnImageUploadedfunction triggers for every new blob in the/imagescontainer - Azure Computer Vision is asked to do image analysis and generate tags for the given image
- Recognized tags will be stored on the blob as custom metadata
- Users ask for the hashtags by sending a
GETrequest to/hashtags/{imageName} - The
GetHashtagsfunction reads all custom metadata from the desired blob and returns them as JSON array
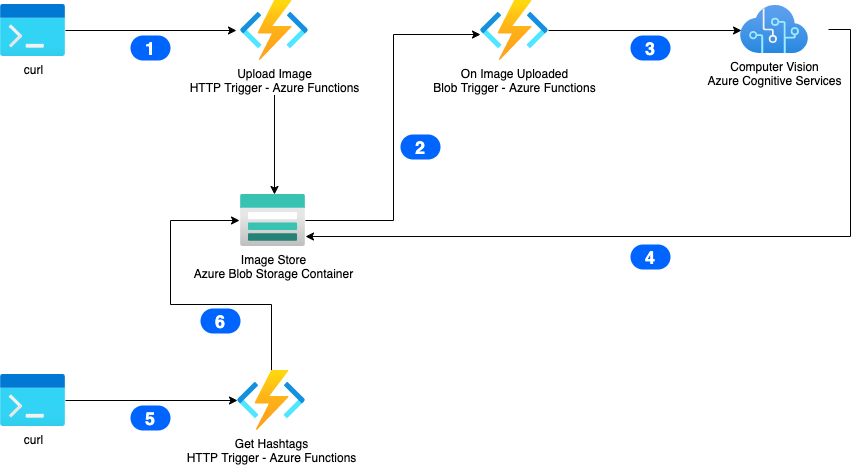
Christmas Image Tagger Workflow
Provision the infrastructure🔗
We will not focus on provisioning all necessary in this post. The sample repository contains a simple shell script that you can use to provision all required services in your Azure subscription. Once you’ve logged in with Azure CLI (az login), and selected the desired Azure subscription (az account set --subscription <your-sub>), invoke the shell script as shown here:
# clone the git repository
git clone [email protected]:ThorstenHans/xmas-tagger.git

# move into the infrastructure folder
cd xmas-tagger/infrastructure

# invoke the provision.sh script
./provision.sh
Once provisioning has finished, you are ready to go. The script provisioned all services and configured necessary sensitive information (API keys, connection strings, …) on the Azure Functions instance.
Implement Azure Functions to interact with Azure Computer Vision🔗
There is a .NET SDK for Azure Computer Vision. Unfortunately, the SDK is not yet available for .NET 6. That’s why the runtime version of the Azure Functions instance is still tied to v3. Hopefully, this will change soon, so we can upgrade the Azure Functions instance to rely on Azure Functions v4.
mkdir functions && cd functions

# create the Azure Functions project
func init --worker-runtime dotnet

# if you've installed .NET 5 or 6 create a new global.json
dotnet new globaljson
# edit global.json and set sdk.version to 3.1.x

# create necessary functions
func new -n UploadImage -t HttpTrigger -l csharp
func new -n GetHashtags -t HttpTrigger -l csharp
func new -n OnImageUploaded -t BlobTrigger -l csharp
You can install Azure Computer Vision SDK for .NET using .NET CLI (dotnet add package):
# install Azure Computer Vision SDK
dotnet add package Microsoft.Azure.CognitiveServices.Vision.ComputerVision
Because the sample comes with a custom Startup class to leverage Dependency Injection (DI) capabilities from .NET in Azure Functions, the following packages must be added to the project too:
dotnet add package Microsoft.NET.Sdk.Functions
dotnet add package Microsoft.Azure.Functions.Extensions
dotnet add package Microsoft.Extensions.DependencyInjection
Last but not least, the latest SDK for Azure Blob Storage is added as a dependency using dotnet add package Azure.Storage.Blob.
Verify Azure Computer Vision configuration🔗
Although the provision.sh script pre-configured all necessary settings on the Azure Functions instance, you should verify them at this point. Locate the endpoint URI and the subscriptionKey (called Key 1 in the Keys and Enpoints blade) using Azure Portal by browsing your instance of Azure Computer Vision:
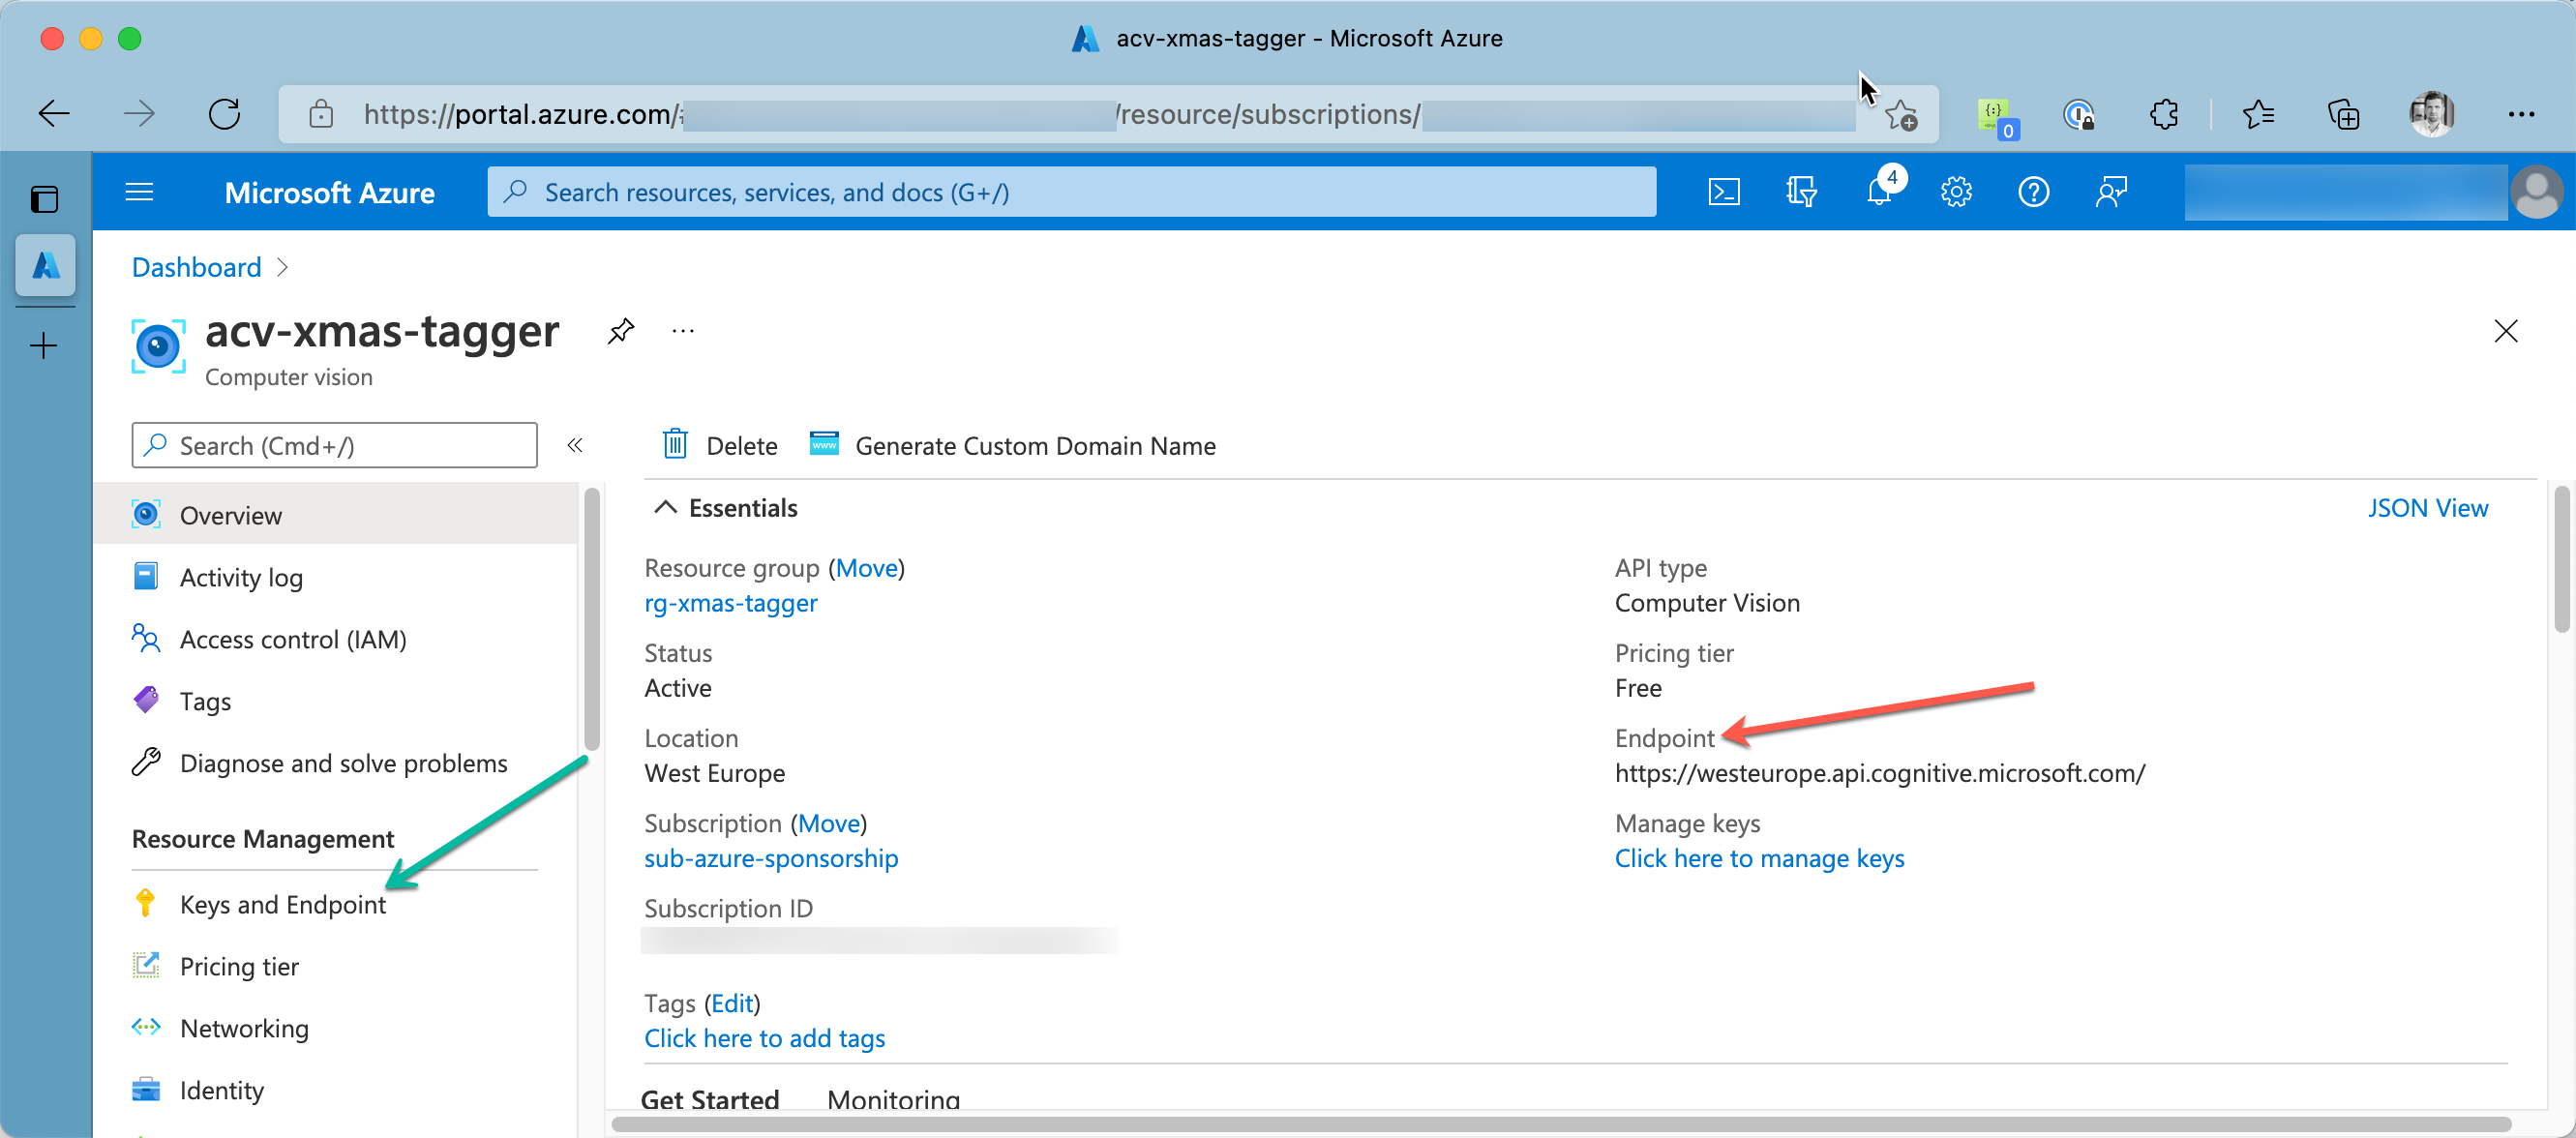
Azure Computer Vision - Fundamental configuration values
Again, in Statup.cs, we bind those configuration values to an instance of XmasTaggerConfig, which we will use later in the OnImageUploaded function.
public class Startup : FunctionsStartup
{
    private static IConfiguration _configuration = null;

    public override void Configure(IFunctionsHostBuilder builder)
    {
        builder.Services.AddOptions<XmasTaggerConfig>()
            .Configure<IConfiguration>((settings, configuration) =>
        {
            configuration.GetSection(XmasTaggerConfig.SectionName).Bind(settings);
        });
    }
}

public class XmasTaggerConfig
{
    public const string SectionName = "ComputerVision";
    public string SubscriptionKey { get; set; }
    public string Endpoint {get;set;}
}
OnImageUploaded: Implement interaction with Azure Computer Vision🔗
Having everything in place, we can take care of the OnImageUploaded function. The function should trigger for every new image being uploaded to the images container of our custom Azure Storage Account (saxmastaggerimages). This is achieved by using a BlobTrigger with the images/{name}.jpg expression:
public class OnImageUploaded
{
    protected XmasTaggerConfig Config {get;}
    protected ILogger<OnImageUploaded> Log {get;}

    public OnImageUploaded(IOptions<XmasTaggerConfig> options,
        ILogger<OnImageUploaded> log)
    {
        Config = options.Value;
        Log = log;
    }

    [FunctionName("OnImageUploaded")]
    public async Task Run([BlobTrigger("images/{name}", Connection = "ImagesStorageAccount")]BlobClient image, string name)
    {
        Log.LogInformation($"OnImageUploaded invoked for {image.Name}");

        // create a ComputerVisionClient using SubscriptionKey and Endpoint
        var client = new ComputerVisionClient(
            new ApiKeyServiceClientCredentials(Config.SubscriptionKey)){
                Endpoint = Config.Endpoint
        };

        // specify desired AI features
        var features = new List<VisualFeatureTypes?> { VisualFeatureTypes.Tags };

        // Process the blob
        var result = await client.AnalyzeImageWithHttpMessagesAsync(image.Uri.ToString(), features);
        Log.LogInformation($"Got response from Computer Vision with status ({result.Response.StatusCode})");

        // extract tags and store them as Dictionary<string,string>
        var tags = result.Body.Tags
            .Select((tag, index) => new { index =$"tag_{index}", tag })
            .ToDictionary(x => x.index, x => x.tag.Name);

        // store tags using custom blob metadata
        await image.SetMetadataAsync(tags);
    }
}
UploadImages: Implement the Azure Function to upload new images🔗
To upload new images, we’ve created a function using the HttpTrigger template. Adding a Blob output binding makes uploading files to Azure Blob Storage straightforward:
[FunctionName("UploadImage")]
public static async Task<IActionResult> Run(
    [HttpTrigger(AuthorizationLevel.Anonymous, "POST", Route = "images")] HttpRequest req,
    [Blob("images/{rand-guid}.jpg", FileAccess.Write, Connection = "ImagesStorageAccount")] BlobClient image,
    ILogger log)
{
    log.LogInformation("C# HTTP trigger function processed a request.");

    var formData = await req.ReadFormAsync();
    if (formData == null ||
        formData.Files == null ||
        formData.Files.Count == 0 ||
        !formData.Files[0].FileName.EndsWith(".jpg"))
    {
        return new BadRequestResult();
    }
    using (var stream = formData.Files[0].OpenReadStream())
    {
        await image.UploadAsync(stream);
    }
    return new OkObjectResult(new { filename = image.Name });
}
GetHashtags: Implement the Azure Function to receive hashtags for an image🔗
Once Azure Computer Vision finished processing and we’ve stored all tags as custom metadata on the blob, we must allow the users to query for the hashtags. Again, we leverage a HttpTrigger. This time we add Blob input binding to look for the desired image specified by the user as part of the route:
[FunctionName("GetImageTags")]
public static async Task<IActionResult> Run(
    [HttpTrigger(AuthorizationLevel.Anonymous, "GET", Route = "tags/{fileName}")] HttpRequest req,
    [Blob("images/{fileName}", FileAccess.Read, Connection = "ImagesStorageAccount")] BlobClient found,
    string fileName,
    ILogger log)
{
    log.LogInformation($"Looking for hashtags ({fileName})");
    // if there is no blob with the provided name return 404
    if ( found == null){
        return new NotFoundResult();
    }

    // load blob properties
    var p = await found.GetPropertiesAsync();

    // create proper hashtags and return them with status code 200
    return new OkObjectResult(p.Value.Metadata.Values.Select(tag=> $"#{ToPascalCase(tag)}"));
}
Hashtags are often specified using pascal-case. We follow this unwritten law by sending every tag through the custom ToPascalCase method:
private static string ToPascalCase(string v){
    if (string.IsNullOrWhiteSpace(v)) return "";

    var info = CultureInfo.CurrentCulture.TextInfo;
    return info.ToTitleCase(v).Replace(" ", string.Empty);
}
Publish the code to Azure Functions🔗
That’s it. We’re ready to publish our code to Azure Functions, and give it a spin. Both Visual Studio and Visual Studio Code smooth integration with Azure Functions and you can easily deploy your code to Azure Functions from both of them. You can also use Azure Functions Core Tools (func CLI) directly:
# publish code to Azure Functions
func azure functionapp publish fn-app-xmas-tagger
Let’s test our serverless Christmas image tagger🔗
Time to upload an image and test our serverless Christmas Image Tagger! As mentioned earlier in the article, we’ll use curl as a frontend for our serverless Christmas Image Tagger. The following snippet shows how to upload a new image (from the local disk):
# upload an image
curl -iX POST -H "Content-Type: multipart-form-data" \
  -F "[email protected]" http://fnapp-xmas-tagger.azurewebsites.net/api/images

HTTP/2 200
content-length: 51
content-type: application/json; charset=utf-8
request-context: appId=cid-v1:47331f1c-359f-45a9-a609-93e1a646b882
date: Wed, 24 Nov 2021 13:41:11 GMT

{"filename":"2fa8c56d-d9b4-42ea-9b2f-ca1bb60a5861.jpg"}%
Take the value of filename, returned from our POST call, and check if hashtags are already set on the image. Again we use curl. However, this time we must issue a GET request and use the filename as the last segment of the URI:
# ask for the hashtags
curl http://fnapp-xmas-tagger.azurewebsites.net/api/hashtags/2fa8c56d-d9b4-42ea-9b2f-ca1bb60a5861.jpg

[
  "#ChristmasTree",
  "#InteriorDesign",
  "#ChristmasDecoration",
  "#Tree",
  "#Indoor",
  "#ChristmasOrnament",
  "#HolidayOrnament",
  "#ChristmasEve",
  "#Spruce",
  "#ChristmasLights",
  "#ColoradoSpruce",
  "#Window",
  "#Ornament",
  "#BalsamFir",
  "#Christmas",
  "#Wall",
  "#Decoration"
]
As you can see, we received an immersive list of hashtags for the image we’ve uploaded 🤘🏼. With that, you’re ready to share your stunning Christmas images on social media using proper hashtags! And if you wondered which image I’ve uploaded, here it is:

Sample Image - source https://unsplash.com/photos/ocq7NBmpOYU
Check remaining Azure Computer Vision credits🔗
Using Azure Computer Vision on the free tier F0 - as we did in this article - we can analyze 5000 images per month. Although that limit sounds to be very high, you should periodically use the az cognitiveservices account list-usage command to check your remaining credits:
az cognitiveservices account list-usage -n acv-xmas-tagger -g rg-xmas-tagger

[
  {
    "currentValue": 293.0,
    "limit": 5000.0,
    "name": {
      "localizedValue": "ComputerVision.Calls",
      "value": "ComputerVision.Calls"
    },
    "nextResetTime": "2021-11-27T00:00:00Z",
    "quotaPeriod": "30.00:00:00",
    "status": "Included",
    "unit": "Count"
  }
]
Cleanup🔗
If you want to remove all resources in your Azure subscription, run the cleanup.sh script, which is also located in the infrastructure folder:
# move into the infrastructure folder
cd infrastructure

# delete the xmas-tagger resource group from your Azure subscription
./cleanup.sh
Conclusion🔗
Microsoft Azure’s Computer Vision Image analysis is easy to integrate with any application. Interacting with the service using its REST API or the available SDKs is super smooth, and the consumption-based pricing model is super appealing to give it a shot today! Finally, we will get proper hashtags for our Christmas images 🎄. So we can flood social media during the holiday season and bump our follower count 🙃.
All code can be found on GitHub in this repository.
Have you already used Azure Computer Vision? I would love to hear what you’ve built with Azure Computer Vision. Reach out on Twitter @ThorstenHans.