Azure Cognitive Search integration for Static Site Generators
Finding appropriate content on websites and blogs boosts the user experience. With Azure Cognitive Search, you can quickly add professional search capabilities to your website. I use Jekyll to run my blog. However, the process described and explained in this post works for every Static Site Generator (SSG).
What is Azure Cognitive Search🔗
Azure Cognitive Search (formerly known as Azure Search) is a fully managed service offering by Microsoft. Apache Lucene is the foundation of Azure Cognitive Search. Over the past year, Microsoft added a whole bunch of AI and Machine Learning (ML) capabilities. Microsoft renamed Azure Search to Azure Cognitive Search to align with other AI & ML service offerings. Although those features are pretty useful, searching website data is relatively simple and does not require any AI or ML features. Azure Cognitive Search can crawl data from different sources such as an Azure Storage Account, Azure SQL Databases, etc. Alternatively, you can actively push data into the search index using the Azure Cognitive Search Management SDK. There are SDKs for different programming languages available - in this article, you will see how to use the JavaScript SDK to push your data into the search index using Node.js.
Azure Cognitive Search Pricing🔗
You pay for Azure Cognitive Search monthly. There are different SKUs (think of editions) available. Although it comes with some limitations and misses an SLA, I use Azure Cognitive Search’s free SKU. It is more than enough for my blog. Also, the 50MB index limitation is no real limit when indexing just website content. However, if you want to index more data, or think about mission-critical production workloads, consider using a different paid SKU. The official documentation provides further details on pricing and service SKUs.
Architectural design🔗
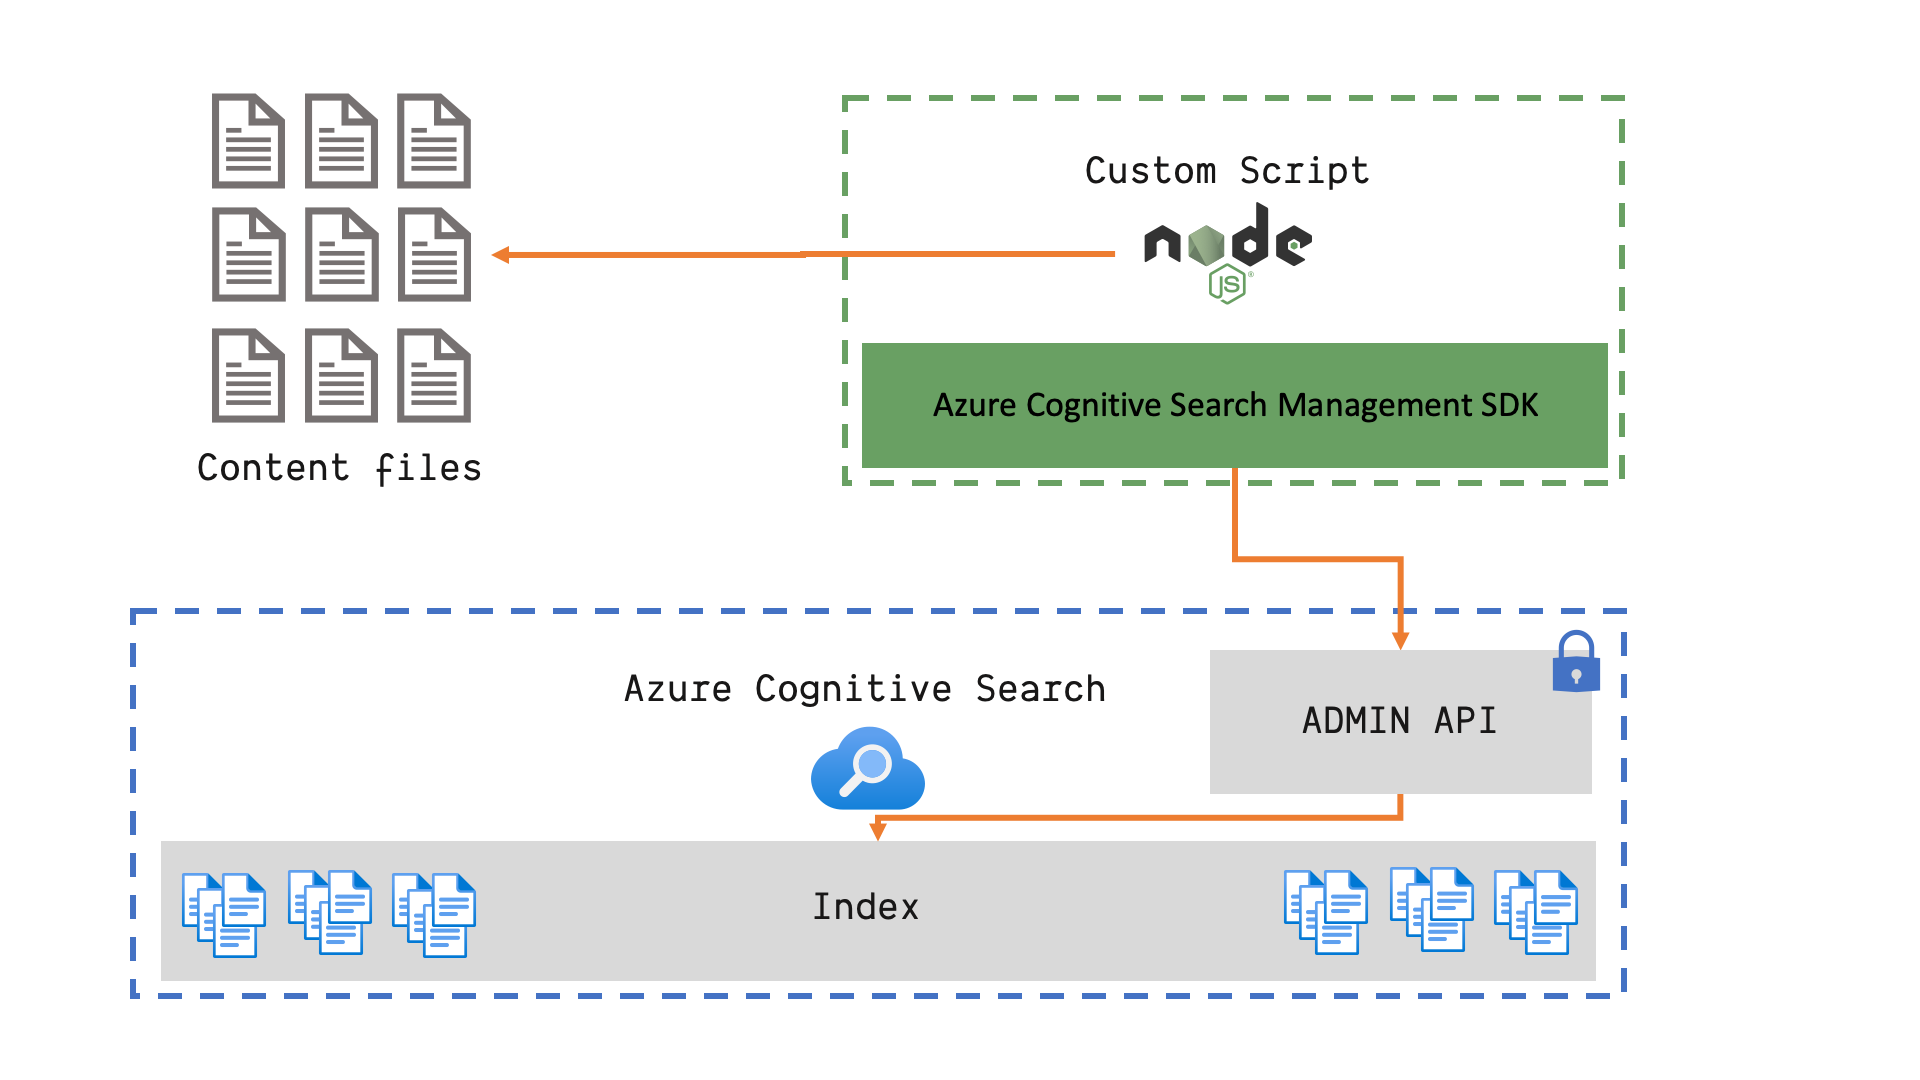
From an architectural perspective, you could query Azure Cognitive Search directly from JavaScript using the REST endpoint exposed by Azure Cognitive Search. However, I prefer this pattern Waldek described in his post.

Azure Cognitive Search Architectural Blueprint
You send search requests through an Azure Functions Proxy to Azure Cognitive Search. The proxy modifies the incoming HTTP request. It adds different metadata to the request before sending it to the Search API. This approach has several advantages:
- API key is hidden from the website (and you can rotate it without redeploying your website)
- You can enhance search queries without redeploying the website
- You can intercept the search query and do complex query modifications
- You have full control over CORS configuration
Create an Azure Cognitive Search Service🔗
As with other Azure resources, you can use any Azure management interface to create and manage Azure Cognitive Search. I prefer using Azure CLI (az) because it is super efficient and commands for all services follow a simple schema.
# Create a Resource Group
az group create -n rg-blog-search -l eastus2

# Create an Azure Cognitive Search Service
az search service create -n blog-search -g rg-blog-search --sku Free -l eastus2
You can install az quickly on your machine. Just follow the Azure CLI installation instructions.
Create a search index🔗
Now that the search service is provisioned, you have to create a new index. An index has a bunch of configuration properties. Fields and Scoring Profiles are the properties we look at in this article to get our search capabilities for SSG based websites up and running. Although you can configure CORS on every index’s scope, we will use the Azure Functions Proxy to configure this.
A field has a certain type (e.g. Edm.String or Edm.Boolean), and every field can have a set of features. Features are capabilities like:
- searchable
- retrievable
- filterable
- sortable
- facetable
The scoring profile ranks recent content (content that has been published in the last 365 days) higher in search results. Azure Cognitive Search offers many different functions you can use in scoring profiles to build a tailored search experience. Again, see the dedicated article on adding scoring profiles to an Azure Cognitive Search index for further details.
To configure an index, you can use the Azure Portal. However, you can also describe the index in JSON. Add a new index and go to the Index Definition (JSON) tab in the Azure Portal. You can download the entire index definition from GitHub. The JSON contains definitions for all required fields, such as the title of an article:
{
  "name": "title",
  "type": "Edm.String",
  "facetable": false,
  "filterable": true,
  "key": false,
  "retrievable": true,
  "searchable": true,
  "sortable": false,
  "analyzer": "standard.lucene",
  "indexAnalyzer": null,
  "searchAnalyzer": null,
  "synonymMaps": [],
  "fields": []
},
And the custom scoring profile to boost recent articles in search results:
"scoringProfiles": [
  {
    "name": "boostRecent",
    "functions": [
      {
        "fieldName": "pubDate",
        "freshness": {
          "boostingDuration": "P365D"
        },
        "interpolation": "quadratic",
        "magnitude": null,
        "distance": null,
        "tag": null,
        "type": "freshness",
        "boost": 3
      }
    ],
    "functionAggregation": 0,
    "text": {
      "weights": {
        "title": 5,
        "description": 3,
        "tags": 2,
        "content": 2
      }
    }
  }
]
You end up with a new index called blog-index. Next, you will push data into the index.
Push data to the index🔗
Having the search index configured, you have to add your data to the index. Azure Cognitive Search offers different capabilities to bring data into the index. For example, you can configure an indexer to load data from Azure Blob Storage into the index continuously. Alternatively, you can use the Azure Cognitive Search Management SDK (Management SDK) to push data into the index. I currently host my blog on Netlify and don’t want to create another Azure resource to use built-in indexer capabilities. That said, actively pushing data into the index using the Management SDK is my way to go.
Azure Cognitive Search - Push data into the index
The Node.js script uses the admin key to interact with the Management APIs. Grab your admin key with az:
# Get Azure Cognitive Search admin key
az search admin-key show --service-name blog-search -g rg-blog-search
Like many other SSGs, Jekyll relies on a combination of front-matter and markdown. Depending on the requirements of your SSG, install corresponding dependencies for the Node.js script.
# create a project directory and move into it
mkdir search-scripts && cd search-scripts

# create a package.json based on your .npmrc
npm init --y

# install dependencies
npm install @azure/search-documents dotenv gray-matter remove-markdown --save

# create the script files
touch feed-index.js blog-data.js
The blog-data.js is responsible for loading all my markdown files and building an array of documents that I’ll push into the index. Notice the custom property called @search.action on every document. It controls how Azure Cognitive Search should deal with the document. mergeOrUpload means that the document is added no matter if it already exists or not.
// blog-data.js
const path = require('path'),
    fs = require('fs'),
    matter = require('gray-matter'),
    removeMd = require('remove-markdown');

module.exports = {
    getAll: () => {
        const postDir = path.join(__dirname, '..', '_posts');

        const posts = [];
        const allFiles = fs.readdirSync(postDir);
        allFiles.forEach(f => {
            if (!f.endsWith('.markdown') && !f.endsWith('.md')) {
                return;
            }
            let postDate = new Date(f.substr(0, 10));
            const singlePost = fs.readFileSync(path.resolve(postDir, f), 'utf-8');
            let doc = matter(singlePost);
            posts.push({
                '@search.action': 'mergeOrUpload',
                id: doc.data.permalink,
                title: doc.data.title,
                tags: doc.data.tags,
                description: doc.data.excerpt,
                content: removeMd(doc.content.replace(/<[^>]+>/g, ' ')),
                url: `/${doc.data.permalink}`,
                pubDate: postDate
            });
        });
        return posts;
    }
}
The feed-index.js is the main script file. It uses the Azure Cognitive Search Management SDK to load data into the index we created before:
// feed-index.js
const { SearchIndexClient, AzureKeyCredential } = require("@azure/search-documents"),
  blogData = require('./blog-data.js');

require("dotenv").config();

const searchServiceName = process.env.AZ_SEARCH_SERVICE_NAME || "";
const adminApiKey = process.env.AZ_SEARCH_ADMIN_KEY || "";

async function main() {

    if (!searchServiceName || !adminApiKey) {
        console.warn('please configure required env vars');
        return;
    }
    const indexClient = new SearchIndexClient(searchServiceName, new AzureKeyCredential(adminApiKey));
    const searchClient = indexClient.getSearchClient(`blog-index`);

    console.log('Uploading documents...');
    const allPosts = blogData.getAll();
    let indexDocumentsResult = await searchClient.mergeOrUploadDocuments(allPosts);
    console.log(`Index operations succeeded: ${JSON.stringify(indexDocumentsResult.results[0].succeeded)}`);
}

main().catch((err) => {
    console.error("Error while re-building Azure Search Index:", err);
});
To execute the script, provide the search service name and the admin key as environment variables and launch the script.
Alternative approach to gather blog data🔗
Alternatively, you can extend your SSG configuration to create a single file containing your content’s required information. This approach may look more natural to some of you. However, I found iterating source files and constructing the dataset manually faster than executing an entire website rebuild - at least for Jekyll.
In the end, the process will not change. Once you have all the required source data in the proper format, you can push it to the search index.
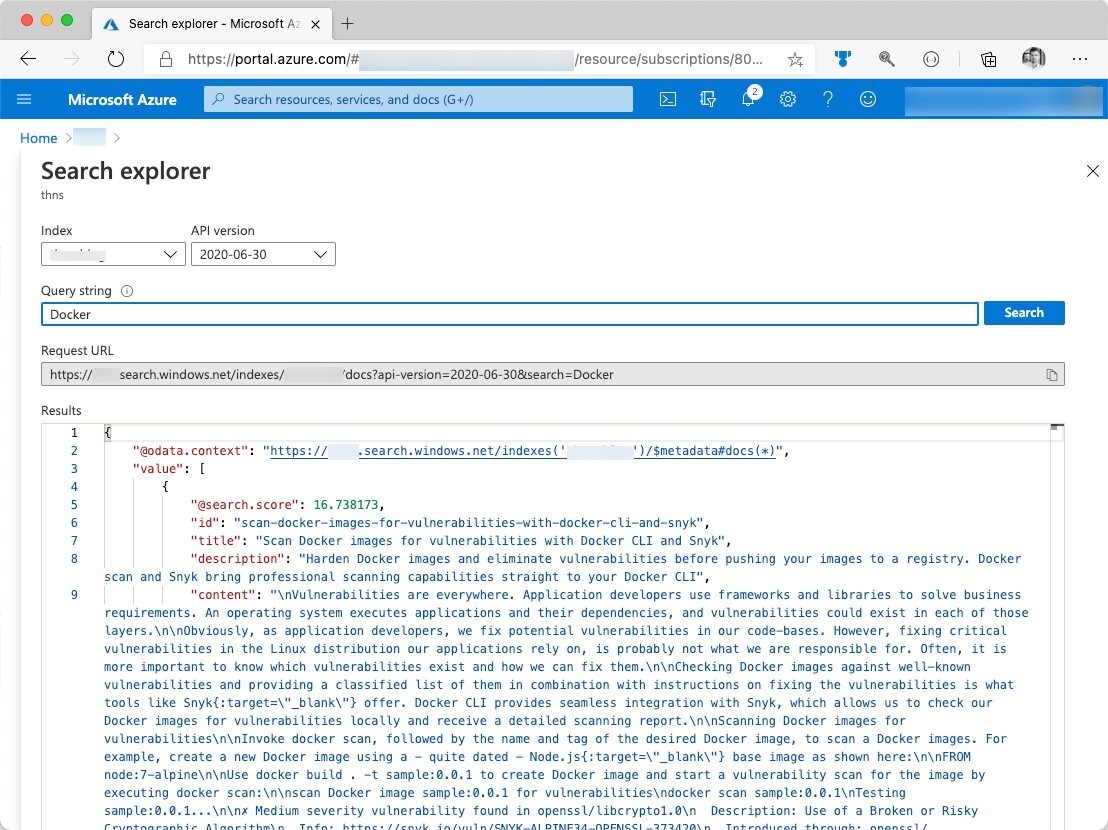
Query your data from Azure Portal🔗
You can already interact with the search service and query your dataset. Use the Search Explorer in Azure Portal and make yourself comfortable with the query syntax. You may also want to dive deeper and use advanced query techniques that go beyond just searching. Take a look at the corresponding pages in the docs like “Advanced queries in Azure Cognitive Search” for example.
Azure Cognitive Search - Query the index manually
Create an Azure Functions App🔗
You can find the desired content using Azure Cognitive Search now. Add a new Azure Functions app to the Azure Resource Group we created previously. The Azure Functions App will act as a proxy in front of the actual search service. Following this pattern, you can execute a query from your static website without specifying a query key in the website.
# create a storage account for the function app
az storage account create -n sablogsearch4711 -g rg-blog-search \
  -l eastus2 -sku Standard_LRS

# create an Azure Functions App
az functionapp create -n fn-blog-search -g rg-blog-search \
  --os-type Windows --runtime dotnet \
  --consumption-plan-location eastus2 \
  --storage-account sablogsearch4711
Please keep in mind that provisioning an Azure Functions app can take several minutes.
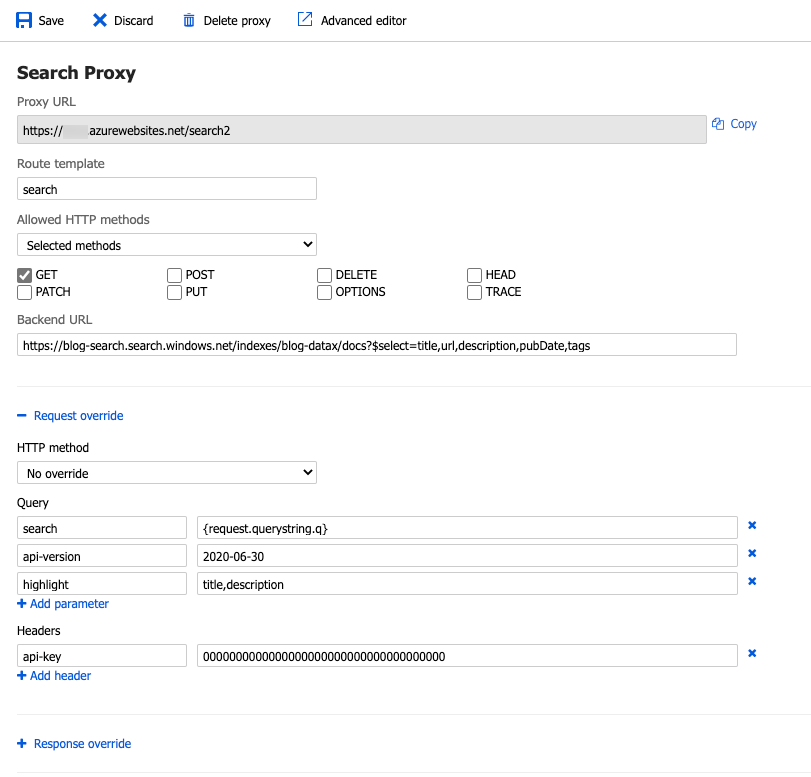
Create an Azure Functions proxy for search requests🔗
Unfortunately, you can not create proxy functions with Azure CLI. Open the Azure Portal and navigate to the Azure Functions App. Find the PROXIES blade and add a new proxy function. To configure the proxy function, you require the final search request URL and the query key. Use az to get the query key:
# get Azure Cognitive Search Query Key
az search query-key show --service-name blog-search -g rg-blog-search
The query URL differs based on the actual query, the name used for the service, and the index name. It follows the https://{search-name}.search.windows.net/indexes/{index-name}/docs?{query} schema. You can use Search Explorer to build a query URL matching your requirements. For demonstration purpose, I use the following request URL https://blog-search.search.windows.net/indexes/blog-index/docs?$select=title,url,description,pubDate,tags.
Having all the required metadata in place, you can configure the proxy function to grab the provided search query from the query string. Forward the query together with the desired api-version, the api-key and the hit highlighting configuration to Azure Cognitive Search. The final configuration of your proxy function should look like shown in the following picture:
Azure Functions Proxy - GET /search
Azure Functions CORS configuration🔗
By default, Azure Functions runtime will prevent client-side API requests from different origins (aka CORS). Use az to whitelist your desired domains. You can whitelist multiple domains at once; separate them with spaces. Also, consider adding the URL you use to test your website locally (like http://localhost:4000) in my case:
# set CORS configuration
az functionapp cors add -n fn-blog-search -g rg-blog-search \
  -a http://localhost:4000 https://thorsten-hans.com
Query Azure Cognitive Search with JavaScript🔗
At this point, you can issue a search request via JavaScript using any framework or library of your choice. Just invoke a GET request to https://{your-sub-domain}.azurewebsites.net/search?q={queryText}. I use the fetch API to execute the request.
const doSearch = (e) => {
  e.preventDefault();
  const queryText = document.querySelector('#queryText').value;
  fetch(`https://{your-sub-domain}.azurewebsites.net/search?q=${encodeURIComponent(queryText)}`)
    .then(response => response.json())
    .then(data => {
      data.value.forEach(r=> displaySearchResult(r));
    })
    .catch(err => {
        // deal with errors
        // show proper error message
        console.log(err);
    });
}
Display search results on your website🔗
Displaying search results differs from website to website. You grab the array of search results and iterate over them. For every search-result in the array of results, you may want to display a dedicated <article></article> node, as shown in the following snippet.
const displaySearchResult = (result) => {
results.append(`<article class="postbox">
<header>
<h2>
<a href="${result.url}" rel="bookmark">${getTitle(result)}</a>
</h2>
<div class="postbox--meta">
<div class="published">
<span><i class="fas fa-clock"/> </span>
<time datetime="${result.pubDate}">${getPublishingDate(result)}</time>
<span class="accent thin"> // </span>
</div>
<div class="tags">
<span><i class="fas fa-tag"/> </span>
${getTags(result)}
</div>
</div>
</header>
<div class="postbox--content">
<p class="postbox--description"></p>
<div class="postbox--description">${getDescription(result)}</div>
</div>
</article>
<hr class="postbox"/>`);
};
const getTitle = (result) => {
if (result['@search.highlights'] && result['@search.highlights'].title) {
return result['@search.highlights'].title[0];
}
return result.title;
};
const getDescription = (result) => {
if (result['@search.highlights'] && result['@search.highlights'].description) {
return result['@search.highlights'].description[0];
}
return result.description;
};
const getTags = (result) => {
return result.tags.map(t => `<a class="tag" href="/tag/${t.replaceAll(/ /g, '-').toLowerCase()}">${t}</a>`).join('');
};
const getPublishingDate = (result) => {
const d = new Date(result.pubDate);
return d.toLocaleDateString(`en-us`, dateFormatOptions);
}
Azure Cognitive Search hit highlighting🔗
Take a closer look at the result object. Previously, we configured hit highlighting; Azure Cognitive Search provides all hits as part of the @search.highlights property. Per property, you find a bunch of HTML where all hits are marked using an <em></em> tag. For my blog, I display hits using the accent color.
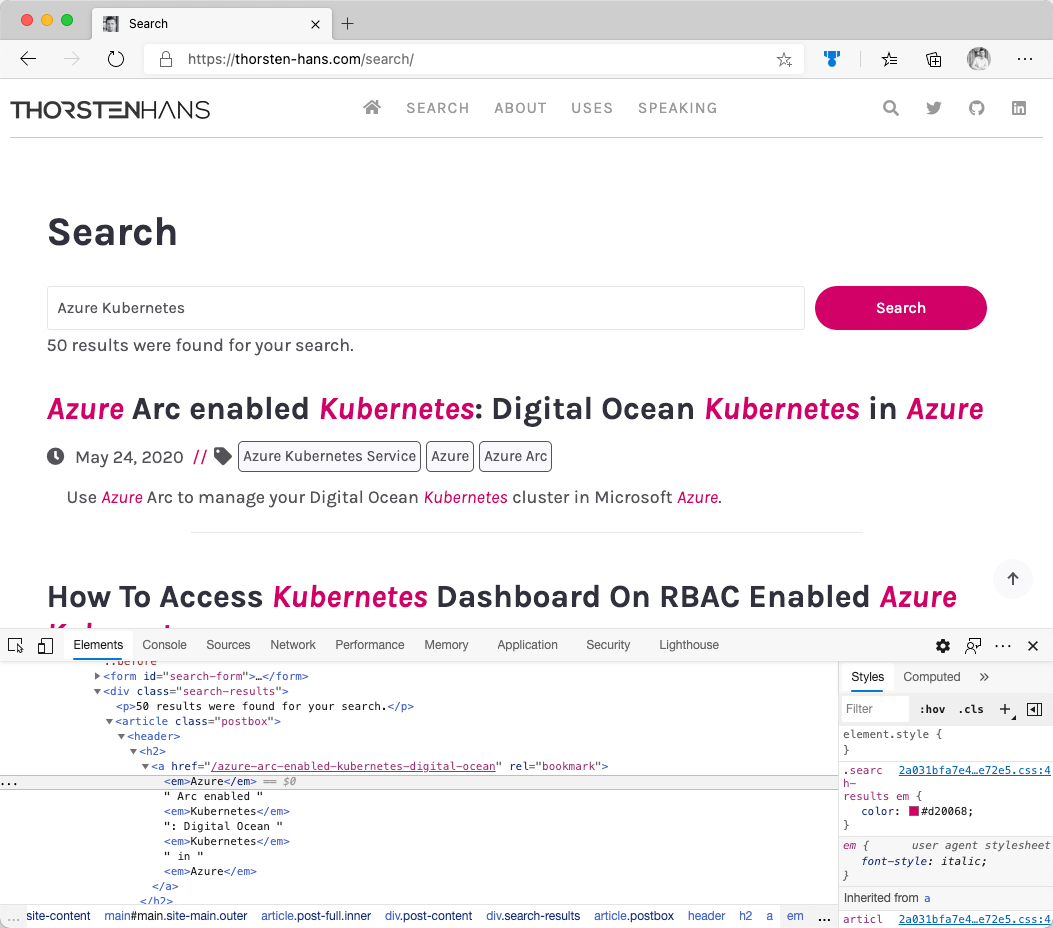
Azure Cognitive Search - Hit Highlighting
Conclusion🔗
Adding custom search capabilities to websites, blogs, and Single Page Applications (SPAs) can increase your audience’s overall user experience. Using the Free SKU of Azure Cognitive Search is great for smaller, non-mission-critical workloads. Features like hit highlighting are quickly configured and help users to spot the content they are interested in. Go ahead and give it a try and use the search on my blog.